HOME >> 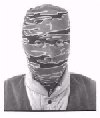 BuckStix TM
![]()
Makers of the Patented BuckStix Vapor Action Deer Scents Deer Lure Dispenser and the Skin-Tite Camo Mask.
![]()
![]()
|
HOME >> Makers of the Patented BuckStix Vapor Action Deer Scents Deer Lure Dispenser and the Skin-Tite Camo Mask.
|
|
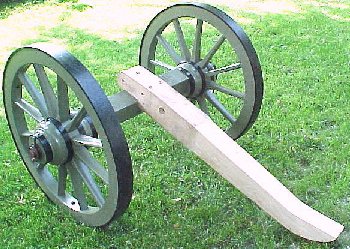
How to Build a 12 pound Mountain Howitzer Cannon ...by Buck Stix
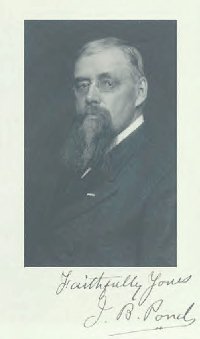
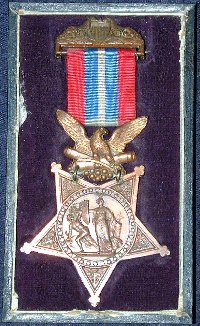
I decided to build a Mountain Howitzer cannon because I'm from Wisconsin. Let me explain. It all started because of a Civil war Veteran named James Burton Pond of Fond du Lac County Wisconsin. He organized Company C of the 3rd Wisconsin Cavalry and was awarded the Medal of Honor for his bravery at a famous Civil War battle at Baxter Springs, KS. October 6, 1863 "While
in command of 2 Companies of Cavalry, This is a photograph of James B. Pond and his Medal of Honor. TO LEARN MORE ABOUT JAMES BURTON POND - CLICK THE PICTURES *************************************************** FABRICATING THE MOUNTAIN HOWITZER CARRIAGE ***************************************************
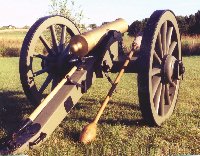
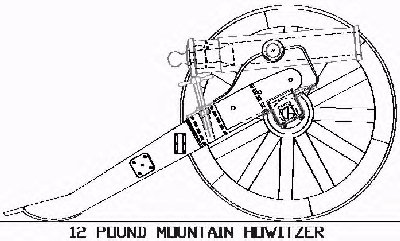
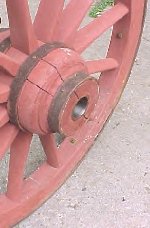
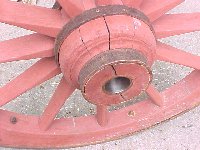
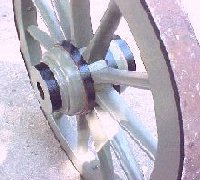
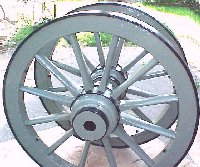
The first step in any "build your own cannon" project is to purchase plans. Although Mountain Howitzer plans are available from a number of sources, most are based on original Civil War plans and are only line drawings with few dimensions. Because of the special "enhancements" of my project, all required drawings were computer drawn in Autocad and stored electronically. >> If you want a set of Mountain Howitzer Carriage or Barrel blueprints, CLICK HERE << During my research, I discovered that original 12 pound Mtn. Howitzer Cannons evolved using 3 different styles of carriages. In choosing a style of carriage for my howitzer, I opted for second type used known as the 1850 #2 prairie carriage. This carriage was nearly identical to the familiar #1 field carriage of the larger guns. It looked scaled down, having smaller 42" diameter wheels instead of 58" diameter wheels of the larger carriage. To begin the project, I decided to build the carriage first, starting with the wheels. There are 3 ways to go about acquiring Mt. Howitzer carriage wheels. They can be built from scratch, using plans, or purchased new from modern carriage wheel builders, or as in this case, they can be restored from original antique artillery wheels. I was very fortunate to find an original set of artillery carriage wheels by searching the internet. The wheels I found were slightly more robust than typical mt howitzer wheels, but they were originally artillery. As an added bonus, they came with a solid steel "lynch-pin" axle. Original artillery carriage wheels are very difficult to find. When I located these in South Dakota, I immediately drove from Wisconsin to get them.
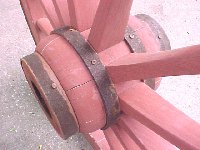
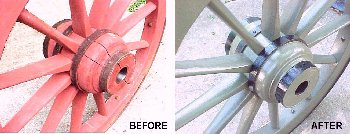
Here is how the wheels looked when I first got them. Unfortunately, the wheels had been stored indoors in a very dry environment, for many, many years. This caused the wood to dry out, shrink and crack. In addition, some surfaces had minor worm damage near the edges of the steel tires. Although there were many unsightly cracks, the majority of the wood was sound and very restorable.
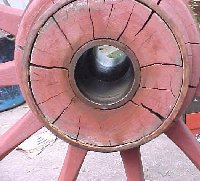
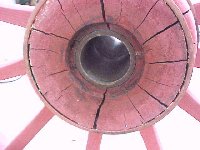
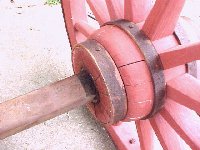
The wheels were constructed with steel 2-1/2" I.D. axle boxes through the hubs. This provided a long 12-1/2" bearing surface. The steel tires were 1/2" thick and 3-1/2" wide. These wheels weighed 140 pounds each. ( Typical mountain howitzer carriage wheels have a 9-1/2" long hub, a 2" wide steel tire, and weigh approximately 70 pounds each. )
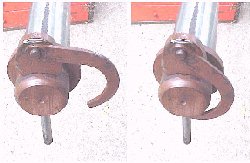
The original lynch-pin axle construction provided for quick wheel removal without tools.
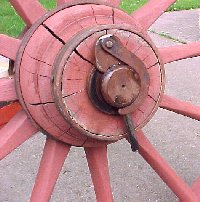
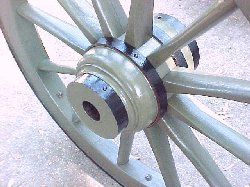
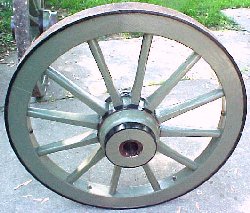
Before starting restoration, both wheels were left outdoors in humid weather for 2 weeks. This conditioning allowed moisture to re-absorbed into the wood which reduced the size of the cracks. During this time, the worm damage areas were chiseled out and wire brushed to remove loose wood particles, dirt and old paint. After conditioning, the worm damaged areas and cracks were filled with a good quality epoxy filler. The excess filler was "scraped" away with no sanding of the wood or metal. ( I wanted the wheels to look original, not new ) Finally, 2 coats of boiled linseed oil were applied to the wheels over both wood and metal. This was followed by 2 coats of oil base "Union Olive Drab" green enamel on the wood, and 2 coats of oil base black enamel on the metal. This was the correct color for an 1850's Mountain Howitzer.
Although most of this work was low-tech, it was easy, and very successful. Compare the before and after results.
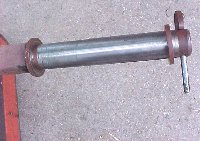
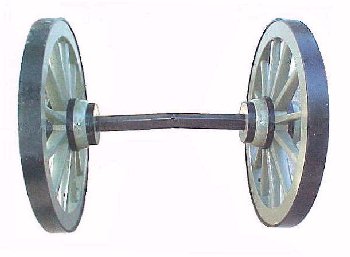
The next step in the restoration process was the axle. The axle as received was 11" too long for the Mountain Howitzer carriage. It measured 43-1/4" between the hubs, instead of the 32-1/4" desired length. The solid 3" square axle was center-cut, shortened, and re-welded at the correct length and camber for a Mountain Howitzer carriage.
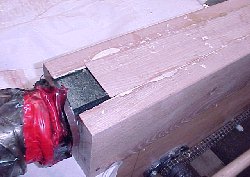
With the axle shortened to the correct length, a wooden axle box was constructed around the steel. White oak was cut and planed to dimension and then securely glued around the square steel axle. A departure from original dimension was made to the axle box. Original Mountain Howitzer carriage plans called for axle boxes of a #2 prairie carriage to be 4" square. Since our wheels were more robust than standard, having 25% larger and longer hubs, we enlarged our axle box to 5" square in order to maintain visual proportion.
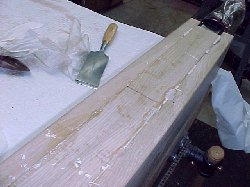
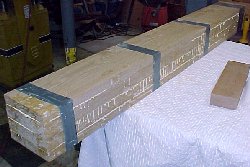
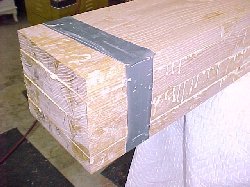
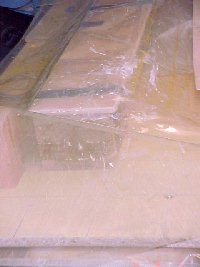
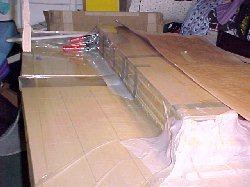
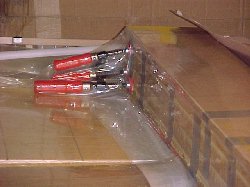
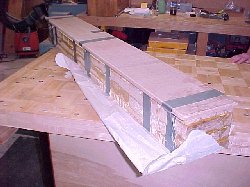
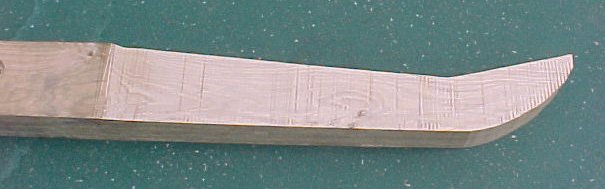
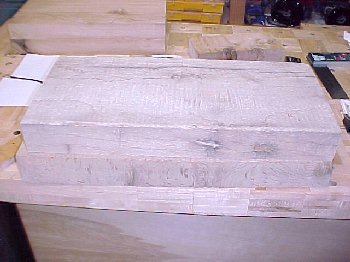
Original Mountain Howitzer carriages were constructed of white oak so we used white oak throughout the project. We selected naturally aged, air-dried wood of 10%-12% moisture content. Although the massive "trail" was typically constructed from a solid white oak beam, we chose to fabricate the trail by laminating together four, 2" thick planks for added strength. The surfaces of the 7 foot long planks were coated with glue and then banded together with duct tape. A few added clamps kept them from shifting.
This massive beam was next placed inside the heavy bag of a large vacuum table. Vacuum was applied and in less than one hour drying time, the completed beam was ready for sawing.
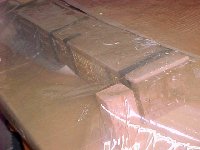
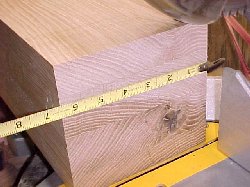
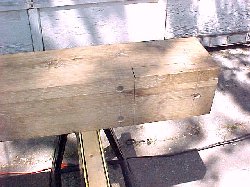
The roughly constructed beam measured 7" by 7" by 7 feet long and weighed over 80 pounds. Next, the 4 sides of the beam were square planed to 6-3/8" and the ends were sawed to finish length.
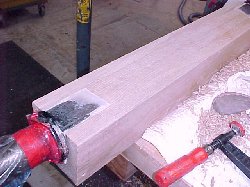
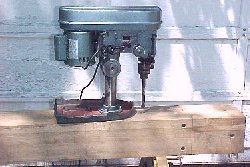
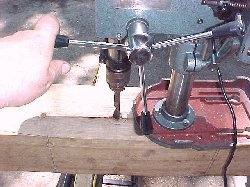
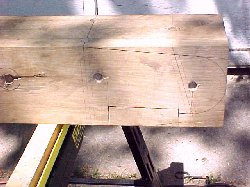
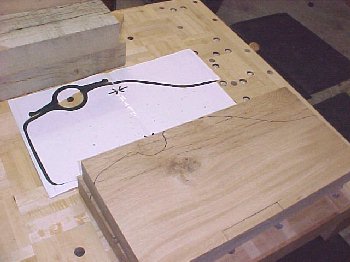
All drawing dimensions were pencil drawn on all 4 sides of the trail. In order to drill the holes straight and square through the thick beam, a small table top drill press was modified by inverting its machined base. This allowed placement of the machined surface of the base against the beam, for perpendicular drilling of the marked holes.
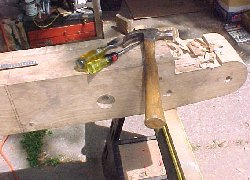
After drilling the holes, double coats of boiled linseed oil were applied inside them. Next, we began to chisel by hand and start shaping the head of the trail. Coarse files and rasps were used which made the work go easy.
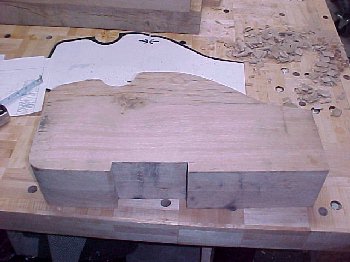
The best way to describe the work is to say "simply remove everything that doesn't look like a Mountain Howitzer trail."
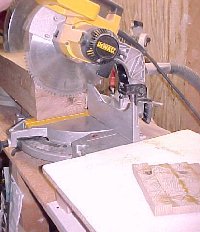
In order to remove large quantities of wood for shaping the rest of the trail, we located a large band saw at a local pattern shop. This pattern shop's saw had a huge 6 foot square table. The large saw table made it easy to handle the heavy beam and follow the pencil lines during sawing. We first cut from the side, then the top, and then the bottom, to obtain the results below. Final shaping and surface smoothing was done using coarse files and a small belt sander with 50 grit paper.
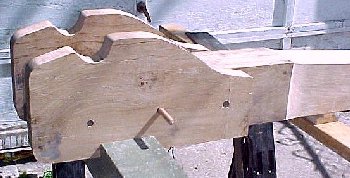
To finish the axle box, the surfaces were again treated by applying 2 coats of boiled linseed oil followed by two coats of the oil based enamel. Before the finish was applied however, the surfaces were "roughed-up" by adding a few dents as well as some chain and rope marks. After painting, it truly looked original antique, matching the surfaces of the wheels. We placed the trail in position on the axle box and added the wheels. Things finally started taking shape.
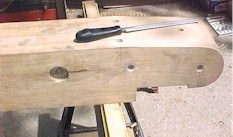
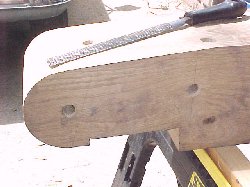
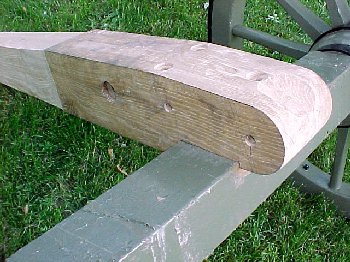
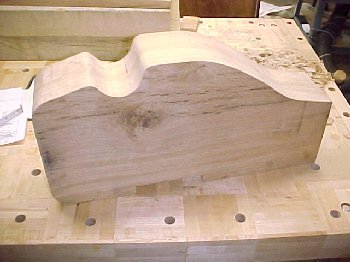
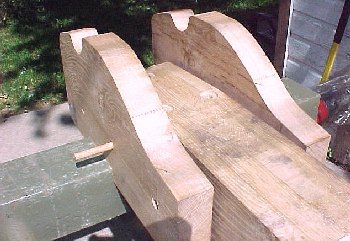
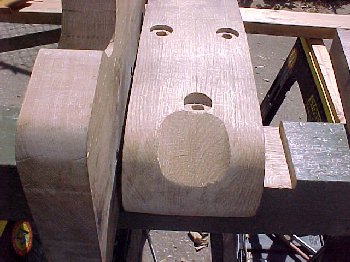
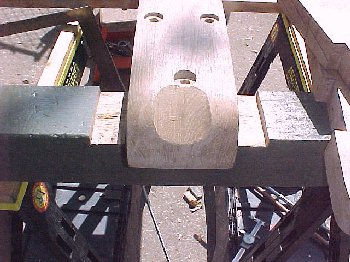
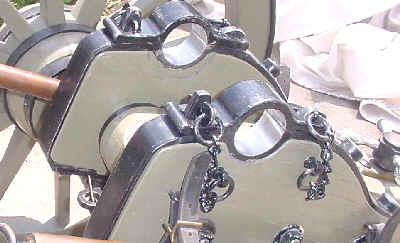
The remaining wooden pieces to be constructed were the two cheeks. These were made from solid 3" thick slabs of white oak. The wood had aged naturally and had a few weather cracks. Once again we tried to match the "antique look" of the original wheels. The slabs were first planed and cut to size, and then band sawed to shape. This work was done as a pair, held together with double-sided tape so that both would be finished identical. A large spindle sander was used for the outside contouring.
We matched the cheeks to the trail, and then to the axle box. The axle box was notched accordingly and final fitting was carefully done with chisels and files. A small bubble level was used to keep everything square and even. Corresponding holes were transferred from the trail through the cheeks. Wooden dowels were used to position and align all the pieces. Once everything matched, the cheeks were slightly distressed, the cracks were filled, and a double dose of the boiled linseed oil was again applied.
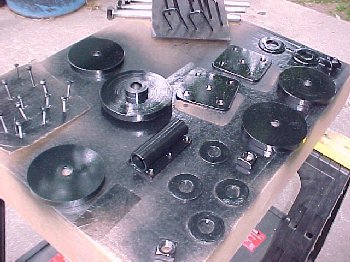
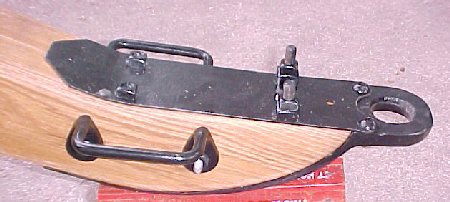
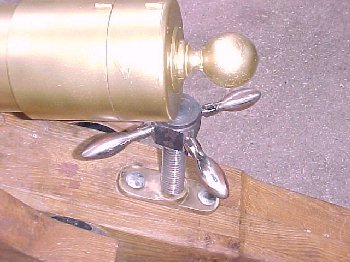
With the woodwork completed, it was time to start fabricating the metal parts. Although most of the metal parts were easily fabricated by following the detailed drawings, those parts which were too difficult or time consuming to make, were purchased. Parts like the Lunette assembly and the elevating screw and box were readily available at a reasonable cost, so they were purchased. Several companies manufacture metal parts for the Mountain Howitzer carriage. Two coats of black enamel were applied to all the metal pieces except the brass elevating screw box.
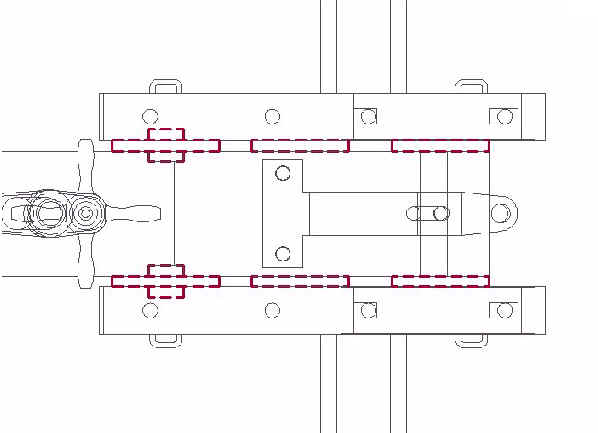
A variation from original carriage design might be considered with the roundels. The roundels are a series of 6 spacers (3 each side) located between the cheeks and trail. They actually served 2 functions. One function was simply as spacers so that variations in barrel width could be accommodated by changing the thickness of the roundel, instead of modifying the carriage. This was useful if an enemy barrel was captured that differed slightly in width. By changing the roundel thickness, the barrel could be fitted to an existing carriage. And, since both North and South used this design during the civil war, if an enemy carriage was captured, it could also be modified to fit an existing barrel.
The second purpose of the rear roundels was to distribute the recoil forces over a wider area than would be had with only a through-bolt. The rear roundel has large diameter shoulders that countersink into both the cheek and the trail. When the barrel recoils, the forces pull back on the cheeks, and the cheeks pull back on the trail and axle box. The stepped shoulder of the large roundel with a 5.1" circumference x 2 = 10.2", provides approximately 3 times the contact area of a 5/8" bolt with its 1.9" circumference x 2 = 3.8".
Unfortunately, using the "stepped" roundel makes for much more difficult assembly. Once the cheeks are installed against the sides of the trail, the whole assembly is interlocked with the roundel shoulders and must be handled as a single unit. If the Mountain Howitzer is to be used only for "blank shots", thereby having virtually no recoil, you may wish to eliminate the shoulders and make the large roundels with "flat" sides like the small ones. That way the pieces are NOT interlocked and can be individually slipped into place. Assembly and disassembly is much easier.
The lunette assembly and the lifting handles were attached to the trail. Any additional holes that were drilled into or through the wood, were double sealed with boiled linseed oil before the hardware was attached. Things were really starting to take shape.
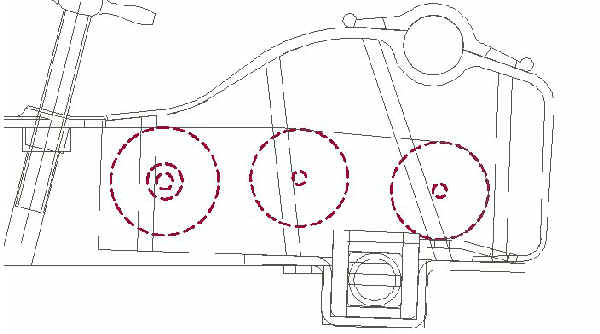
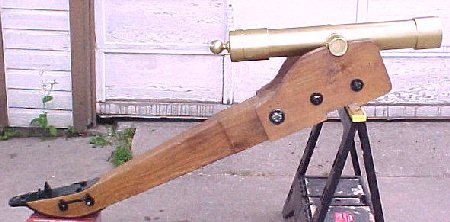
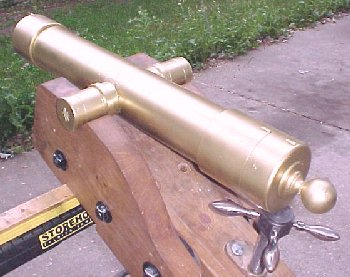
In order to accurately locate the elevating screw box, a "mock" barrel was fabricated using 4" diameter PVC toilet pipe and fittings. Critical points on the barrel such as the "rear rim base" and the "trunnion locations" were duplicated from the barrel drawings. It was much easier to use a 2 pound plastic mountain howitzer barrel for locating these parts, than it would have been if we had used a 225 pound steel barrel. ( You don't have to get as carried away as I did when making the mock barrel, but all the barrel pieces, including the wooden cascabel and brass paint, only cost about $20 ) The lightweight PVC barrel was very easy to manipulate.
All of the remaining wood carriage pieces were painted and assembled, as were the remaining steel pieces such as the wheel guards, axle bands and the folding handspike assembly. Finally, the leather implement straps were attached and the light weight PVC barrel was held in place using 2" wide leather strips that were tacked down with 1" nails. When everything was assembled, it looked like a real Mountain Howitzer cannon, even with though the barrel was only a plastic toilet pipe.
Next see how we made the >> CHEEKS
|
|
Send a photo using Buck Stix Deer Scent Deer Lure Dispenser, Buck Lure or Earth Soap to be in our Scrap Book. Web Page Design: Buck Stix Copyright (c) 2000-2024 All contents property of BuckStix.com Based
in Oshkosh, Wisconsin, Heart of Whitetail Country, USA.
|